Saturday, July 20, 2013

How to Root Samsung Galaxy | A Step by Step Guide

How to Root Samsung Galaxy Y 

If you follow this method to root Samsung Galaxy Y, then there is no reason for your failure. Just follow this step by step guide and see the magic.

Samsung Galaxy Y has created buzz in the Indian cell phone market due to its value of price. The price of this device is below Rs. 8000, which is very low for a decent Smartphone. There are some Android phones made by India brands like Micromax or Karbonn at that range but everybody do not like them. You cannot get a good multinational branded Android phone at such a low price as Samsung Galaxy Y. This is the main reason of its huge popularity.


But Why Should you Root Samsung Galaxy Y?

Samsung is a big brand who sells phone at such a price which is more than twice or thrice of its manufacturing cost. So, as the price of SGY is under Rs. 8000, the company has not spend more than 4000 to build it. So, the hardware of this phone is not that capable for Android operations. It sports a 830MHz ARM V6 processor and 290 MB RAM, which is not enough for playing good graphical games. But there is a method to over clock the processor to 1 GHz! For that you need to root the mobile. You can also upgrade your phone from outdated Gingerbread to ICS. You can even create virtual RAM space on a SD card to increase its performance. So, you can see rooting the phone may open endless possibilities for your handset


Read it before proceeding further

1) Do you have any experience about how to root an Android device? Do, you have even any idea? If the answers are no then I think you should seek the help from such a person to do it. It is because this type of operations has some risks. You may end up bricking your phone.

2) Did you have charged your phone to at least 60%? You need to do it for being on the safe side. If it switches itself off during the root process; your phone could be bricked.

3) Do not try this method on any other phone than Samsung Galaxy Y.


Disclaimer

You shall have to understand that you have to do it by your own accord. The author or this site is not any way responsible for any kind of damage to your phone during the process.

Requisites                                          

                                                                            
1) A PC or Netbook

2) Working internet connection

3) USB Data Cable

4) Samsung USB drivers or KIES.

5) A Samsung Galaxy Y S5360 mobile phone


Instructions: Stage I

1) Backup your files. You need to keep your important data like contacts, notes or photos etc on your PC or cloud.

2) Open your PC and connect it to internet.

3) Download zip file from here

4) Now connect your Galaxy Y with PC using the data cable.

5) Copy the zip to your handsets SD card.

6) Disconnect it from the computer.

Stage II

This stage will be done on your phone so, switch your PC off.

1) Open Settings, go to Applications then Development and check USB Debugging.

2) Now reboot your phone and press VOL Up + Home + Power together during the booting.

3) The Recovery Mode will be opened. If you do not see the recovery mode then try the method no. 2 again.

4) In recovery mode use the Vol Up and Down buttons to navigate and the Home button to select.

5) Now select “Install Zip from SD card.”

6) Then select “Choose Zip from SD card” and find out and select the Zip previously downloaded.

7) The download process will start and will take more than 10 minutes.

8) After the completion of the update follow the next steps on recovery mode.

9) Then select “Wipe Data/Factory Reset”.

10) Now enable “Wipe Cache Partition”.

11) After that select “++++Go Back++++”

12) Reboot the phone and you shall get it rooted.

Conclusion

This method is tested many times and it was successful at every test. But you shall keep it mind that an Android phone is a strange beast. Just like a computer you cannot predict each and every device’s behavior. So, go with caution. If you like this article, then please do not forget to like it.

continue reading

Saturday, August 11, 2012

Only Intelligence Not Trick!!!


Birthday Date Calculation


No1: Birthday magic 
Step1: Add 18 to your birth month. 
Step2: Multiply by 25. 
Step3: Subtract 333. 
Step4: Multiply by 8. 
step5: Subtract 554. 
step6: Divide by 2. 
step7: Add your birth date. 
step8: Multiply by 5.
step9: Add 692.
step10: Multiply by 20.
step11: Add only the last two digits of your birth year.
step12: Subtract 32940 to get your birthday!.
Example: If the answer is 123199 means that you were born on December 31, 1999. If the answer is not right, you followed the directions incorrectly or lied about your birthday.


Age Calculation

Here you can find the age using some tricks. You can play these trick as instructed, with your parents or friends and prove your talent to them. 
Age Calculation : 
Step1: Multiply the first number of the age by 5. (If <10, ex 5, consider it as 05. If it is >100, ex: 102, then take 10 as the first digit, 2 as the second one.) 
Step2: Add 3 to the result.
Step3: Double the answer.
Step4: Add the second digit of the number with the result.
Step5: Subtract 6 from it.
Answer: That is your age.

One + one are two joke

Theorem: 1 + 1 = 2 
Proof: 
n(2n – 2) = n(2n – 2) 
n(2n – 2) – n(2n – 2) = 0
(n – n)(2n – 2) = 0
2n(n – n) – 2(n – n) = 0
2n – 2 = 0
2n = 2
n + n = 2
or setting n = 1
1 + 1 = 2

Dollars equal ten cents joke

Theorem: 1$ = 10 cent 
Proof: 
We know that $1 = 100 cents 
Divide both sides by 100 
$ 1/100 = 100/100 cents 
=> $ 1/100 = 1 cent 
Take square root both side 
=> squr($1/100) = squr (1 cent) 
=> $ 1/10 = 1 cent
Multiply both side by 10
=> $1 = 10 cent


continue reading

Saturday, June 23, 2012

Create a Password-Protected invisible folder without any software


Copy and paste the following code in notepad


cls
@echo off
title Folder Locker
IF EXIST "Control Panel.{21EC2020-3AEA-1069-A2DD-08002B303­09D}" GOTO UNLOCK
IF NOT EXIST Locker GOTO MDLOCKER
echo Folder Created.
:CONFIRM
echo Are you sure you want to lock the folder? (Y/N)
set/p "cho="
IF %cho%==Y GOTO LOCK
IF %cho%==y GOTO LOCK
IF %cho%==N GOTO END
IF %cho%==n GOTO END
echo Invalid Choice.
GOTO CONFIRM
:LOCK
ren Locker "Control Panel.{21EC2020-3AEA-1069-A2DD-08002B303­09D}"
attrib +h +s "Control Panel.{21EC2020-3AEA-1069-A2DD-08002B303­09D}"
echo Folder Locked.
GOTO END
:UNLOCK
echo Enter password to unlock the Folder :
set/p "pass="
IF NOT %pass% == YourPasswordHere GOTO FAIL
attrib -h -s "Control Panel.{21EC2020-3AEA-1069-A2DD-08002B303­09D}"
ren "Control Panel.{21EC2020-3AEA-1069-A2DD-08002B303­09D}" LOCK
echo Folder Unlocked Successfully.
GOTO END
:FAIL
echo Invalid Password!
GOTO END
:MDLOCKER
md Locker
echo Folder created.
GOTO END
:END
PAUSE


In the above code change YourPasswordHere with your own password
Save the file with .bat extension. 


Another simple Way 


Step 1: First you have to make your folders totally invisible, to do this follow these steps -
  • Create a new folder with any name
  • Rename the folder with a space (U have to hold ALT key and type 0160).
  • Now u have created a folder without a name or the name is only space.
  • Now Right click on the folder >> properties >> customize.
  • Now click on change icon.
  • Scroll down and you should find some empty spaces.
  • Click on any one of them and Click ok
  • Thats it, now your folder has become invisible .
Step 2: Now you have to follow these steps -
  • Suppose you have a folder named abcd in D:\abcd.
  • In the same drive next to the folder create a new notepad file with the exact statement ren abcd abcd.{21EC2020-3AEA-1069-A2DD-08002B30309D}
  • Now save this text file as loc.bat
  • Create another notepad file and type ren abcd.{21EC2020-3AEA-1069-A2DD-08002B30309D} abcd
  • Save this as key.bat
  • Now there are two batch files . Double click loc.bat and your folder will change into Control Panel and its contents cannot be viewed .
  • To open the folder double click key.bat and you get back your original folder .
  • For more safety keep the key.bat in another location .Only for unlocking copy paste to the original location and double click .
Now if you combine the Step 2 with Step 1 it will be impossible for anyone else to access it except you.

continue reading

New Windows 7 BitLocker Tool (BitLocker to Go) and BitLocker Password Recovery


Windows 7 has new improvements and add on enhancements on Windows BitLocker windows disk encryption tool.
Windows 7 BitLocker to Go is an easy to use and provides a covering security for the users' files not only protecting files on computer disks but also securing by encrypting files on removable devices like SD Cards, flash disks, etc.
BitLocker to Go enables system administrators to control how Windows 7 users in their comain can use removable storage devices and to control the strength of protection over removable devices required.
Windows 7 BitLocker Tool
Windows BitLocker is one of the security application first introduced to users with Windows Vista the previous OS released before Windows 7.
BitLocker is a Windows disk encryption tool for encrypting the whole disk drive in order to protect your data.
Even the disk is stolen or even the computer or your laptop is stolen, it is not possible to reach and reveal the contents of the disk.
Windows users can use encrypted drives by using a password or a smart card where Windows Vista or Windows 7 does not transparently decrypt the disk drives for users.
If your computer has a supporting Trusted Protection Module (TPM) chip and fulfills the Trusted Platform Module secure cryptoprocessor specifications, Windows BitLocker will have an additional protection on your disks as an enhanced Windows disk encryption tool.
Vista users did not much like the Vista BitLocker tool because of it was difficult to use.
But Microsoft has improved Windows BitLocker with Windows 7 for an easy use and introduced the newBitLocker to Go encrypting applications for supplying more security for Windows users to keep their private files away from anauthorized hands in mobile devices, SD Cards, flash disks, and similar removable devices.
What makes Windows BitLocker and Windows BitLocker to Go a head of other windows disk encryption tools like openfree -source disk encryption software TrueCrypt is it can be set as a group policy or local policies in enterprise environments to keep confidential company data.
For example, if you disable writing data on a removable device where BitLocker to Go is not installed, it is not possible to copy a file on to that flash disk, SD Card, etc before turning on BitLocker for that device.
Otherwise you will face a "The disk is write-protected" error message.
I believe I could give a brief answer to question "What is Windows BitLocker ?" and "What is Windows 7 BitLocker to Go ?"
Now in the continuing tutorial, I will try answer the following questions with a simple demo for Windows 7 BitLocker setup, using BitLocker Viewer, Windows BitLocker Password Recovery using BitLocker Keys, etc.
How can we set up BitLocker to Go on a Removable Device ?
How can we use BitLocker to Go Viewer ?
What can we do for BitLocker Recovery and Password Recovery ?

How can we encrypt files using Windows BitLocker tool for removable devices - BitLocker to Go ?

Now we will use Windows 7 BitLocker to Go and encrypt your private files or confidential data files with this new Windows disk encryption tool.
You will see how easy and how quick we will implement the BitLocker To Go and begin using my favourite windows disk encryption tool within minutes.

How to Activate BitLocker to Go

In the first step, please insert your SD Card, flash disk or any other removable data storage device or media.
Open the Windows Explorer and go to My Computer.
You will see the removable storage device mapped as a new drive.
Right click on the drive which you want to store encrypted files as contents of the BitLocker tool.
Windows 7 BitLocker To Go
Select "Turn on BitLocker ..." and follow the instructions within the Windows BitLocker Wizard step by step.
Please note that you can reach the similar "Turn on BitLocker" command and following setup screens following the Control Panel > System and Security > BitLocker Drive Encryption control screen.
We will have to wait for a short time during the start of Windows BitLocker drive encryption.
You should not remove the device while Windows 7 BitLocker process is initializing the drive.
Don't mind it will last for only a minute or less.
Starting BitLocker Drive Encryption
Actually this is the first screen we will interact with the wizard. In this screen we will make a decision and make our choice on how to unlock the encrypted drive between using a password or using a smart card.
Check the "Use password to unlock the drive" mark and BitLocker will request a password from you to authenticate requests to unlock the drive.
You can also choose to use a smart cart to unlock the BitLocker enabled drive.
Windows 7 BitLocker Password
You will use this password to view the contents of this BitLocker encrypted drive as readonly files on other computers.
And on your computer where Windows 7 is installed, you can paste new files into this encrypted drive using this password.
Actually Windows 7 will automatically authenticate and unlock the drive without any password entry by user.
BitLocker setup guide will also ask you "How you want to store your recovery key ?"
Possible options for storing the Windows 7 BitLocker Recovery Key is saving the recovery key to a file or printing the recovery key and keeping it on a printed document.
Store Windows 7 BitLocker Recovery Key
If you forget your BitLocker password or lose your smart card, it is possible to access the drive and recover encrypted files in the Windows 7 BitLocker encrypted drive by using the BitLocker Recovery Key.
I can suggest you to keep Recovery Key using both methods. But keep both soft version and documented version of the recovery key in a safe place. Because if your disk is stolen and your recovery key is also stolen with your disk, then your disk can be unlock using this information.
You can also use a Smart Card instead of using a password tp protect BitLocker encrypted files or to display the contents of the encrypted drive.
In this BitLocker guide, I will show you how to encrypt files and store them in a BitLocker enabled storage and decrypt driver by using a password.
Windows BitLocker Encrypt Drive
In the above screen, the wizard requests a confirmation for encrypting the drive for the last time.
If you press "Start Encrypting" button the encryption will begin and might take a while depending on the size of the drive.
If you are using a SD Card with less than 1 GB values this encryption process will last less than a minute.
Note that until the encrypting process is finished the files on the device are not protected.
Windows 7 Encrypting by BitLocker
You can track the encryption process following the bar.
Windows BitLocker Drive Encryption is complete
And after the encryption process is completed on the Windows Explorer screen the disk drive is displayed with the below icon showing unlock status of the device.
Drive Encrypted by Windows BitLocker
If you explore the encrypted drive using the Windows Explorer, all you will see is a "Read Me" file and the BitLockerToGo.exe application file.
Explore BitLocker Encrypted Drive

How can we use BitLocker to Go Viewer ?

To protect files in BitLocker enabled mobile devices, all you should do is to copy them or drag-drop files into the BitLocker enabled drive on a Windows 7 computer.
On other computers like Windows XP where BitLocker application is not installed you can only view the contents of the drive read-only after you have entered your BitLocker password.
Windows-7-BitLocker-To-Go
If you use this BitLocker enabled flash disk on an other computer, the BitLocker.exe application will run automatically and will ask you the BitLocker password you have set while installing BitLocker on the data storage device.
When you supply the correct password you will be able to display the contents of the device as readonly.
When you double click a file listed in the contents of the disk, you will see the below warning and will not be able to open the file by this method.
You can open files on BitLocker enabled device only by copying them onto the other computer. Since the encrypted file will be decrypted back to a readable state after it is out from the removable storage device. After copying them on the other computer then these files are in a reachable state by the approtiate program.
Windows BitLocker Copy Files

How to recover BitLocker password, BitLocker Recovery and Password Recovery ?

It is always possible to forget the password you set while installing the BitLocker. In such a situation you should take out the Recovery Key file or the printed recovery key in front of you from where you have hide.
If you forget your Windows 7 BitLocker password, please click the "I forget my password" link just below the password input text area.
BitLocker Forget Password
You will be asked for the BitLocker Recovery Key. You can use your recovery key to unlock the drive.
BitLocker Recover Password
Your recovery key was created when BitLocker was first setup. The recovery key might have been saved or printed, or you might need to get it from your system administrator (depending on your company's security policy).
Then you can display the contents of the BitLocker enabled storage again.
Windows 7 BitLocker Enabled Device Contents


thankyou

continue reading

How to Change Windows 7 Logon Screen Background using Registry for Screen Wallpaper


Windows 7 will soon meet with end user customers. Many Windows XP and Vista users are looking for to upgrade or migrate their operating system (OS) to Windows 7.
No matter how functional and well designed Windows 7 is, users will demand for customizing Windows 7 as their wish.

For example users will like to change Windows 7 logon screen. For instance, I change Windows 7 logon background from default blue screen to a Star Trek Windows 7 logon wallpaper without using a logon changer.
Here is the default Windows 7 login screen background. Windows users can easily change the flower because Windows 7 has a user interface for changing the logon screen user icon.
But there is not a built-in Windows 7 Logon changer for customizing and changing logon background.


I must say that I loved the new logon background which is prepared by Microsoft for Windows 7.
But let's summarize the steps for changing logon screen for its background for whom wishes to change Windows 7 as their likes.


Let's start identifying the Windows 7 logon background in the Windows system folders.
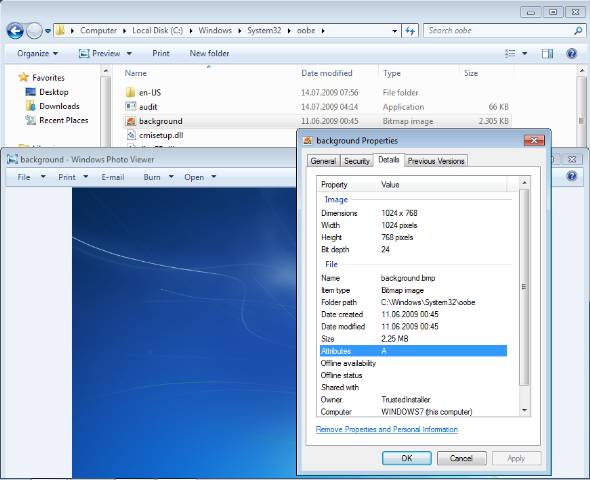
Windows 7 login background resides in OOBE file folder. You can find the OOBE folder in System32 subfolder of Windows installation folder.
The default path is as follows if you did not change the default Windows 7 installation folder.

C:\Windows\System32\oobe\

And within the oobe folder you will notice the logon background.bmp wallpaper image.
This default logon screen image is in 1024 x 768 pixels size.

We can also use .jpeg images instead of using .bmp bitmap images for Windows 7 logon wallpaper without using a Windows 7 Logon Changer application.

Unfortunately changing logon screen image is not as easy as just renaming the default background wallpaper and copy a new background image into the oobe folder.
If you try to rename the default login screen image background.bmp, the following error message will stop you continue to change the screen background.
File Access Denied
You need permission to perform this action.
You require permission from TrustedInstaller to make changes to this file.

change permission Windows 7 login screen background bmp


We will not continue to find a way to change this protected background image.
There is a work-around which will enable us change the Windows 7 logon background throughWindows Registry.
To start the Windows 7 Registry Editor, type regedit in the Windows 7 start menu search text area and press Enter. Even while typing the word regedit, Windows 7 will list the regedit Registry Editor Windows 7 tool in the Programs list.
Click on the RegEdit to start the Registry Editor Window 7 tool for editing windows registry settings which will let us change the login screen background.


open Windows 7 regedit registry editor


The User Account Control (UAC) we are familiar from Windows Vista will ask permission to execute the Registy Editor program.
We will click on the "Yes" button in order to allow the Windows Registry tool to make the required registry changes


.
Windows 7 User Account Control UAC screen


Drill through the Windows 7 registry following the below registry path.

Computer\HKEY_LOCAL_MACHINE\SOFTWARE\
Microsoft\Windows\CurrentVersion\Authentication\LogonUI\Background


If there is already an OEMBackground DWORD entry within the Windows 7 Background registry key, set the value of OEMBackground DWORD entry to 1.
If not exists, select new DWORD by a right click and in the displayed context menu. Set the name to OEMBackground and its value to 1 as shown in the below screenshot.


Windows 7 registry LogonUI background


Now after changing the LogonUI and OEMBackground, we are finished with the Win7 registry. You can now close the registry tool.
The next step is creating a folder to store the wallpaper and background images which we will use to change shutdown background for Windows7.
Open the Oobe folder again. If you forget the folder path it is in the System32 Windows 7 install folder.
Now create a new file folder named Info in the oobe folder.
You need to confirm this operation by selecting Continue button.


destination access denied for Windows 7 oobe folder


Then create a second folder backgrounds, this time within the recent created folder info.
Windows7 will request your confirmation for this operation too.
Windows logon screen create info folder
We are now at the last step to change Windows 7 logon background. Rename the image which you want to use as logon background as backgrounddefault.jpg.
And copy and paste the background wallpaper backgrounddefault.jpg to the backgrounds file folder which resides in "\oobe\info".
Of course you have o confirm this operation too.


Windows 7 logon screen copy access error backgrounds folder


After completing all above steps to change Windows 7 logon screen image, we are ready to test if we were successful in changing logon background.
Simply click on the Start button then select Lock command for instance.
Here is my new Windows 7 logon wallpaper, Star Trek background image which I could change shutdown background without using Windows 7 logon changer tools.


For study ......................only

continue reading

Using command prompt "attrib" to check for Viruses or Malware


To start attrib
  1. Go to Start Menu > Run
  2. Type cmd (cmd stands for command prompt)
  3. Press Enter key
The Command Prompt will appear showing us where is our location in the directory.

Using attrib

To use attrib
  1. Go to the root directory first by typing cd\(because this is always the target of Malware / Virus)
2. Type attrib and press Enter key

In this example, I have two files that are considered as malware.
Note that there are two files which I outlined in red (SilentSoftech.exe and autorun.inf). Since you cannot see this file nor delete it (because the attributes that was set on these files are +s +h +r)
  1. +s - meaning it is a system file (which also means that you cannot delete it just by using the delete command)
  2. +h - means it is hidden (so you cannot delete it)

  3. +r - means it is a read only file ( which also means that you cannot delete it just by using the delete command)

Now we need to set the attributes of autorun.inf to -s -h -r (so that we can manually delete it)
  1. Type attrib -s -h -r autorun.inf ( be sure to include -s -h -r because you cannot change the attributes using only -s or -h or -r alone)
  2. Type attrib again to check if your changes have been commited
  3. If the autorun.inf file has no more attributes, you can now delete it by typingdel autorun.inf
  4. Since SilentSoftech.exe is a malware you can remove its attributes by doing step 1 and step 3(just change the filename) ex. attrib -s -h -r silentsoftech.exe


THANKYOU...

continue reading

Remove Virus By Windows System Registry

It's hard to remove the virus in the Windows System Registry, because it's not easy to find where the virus hides. Also, it's danger to edit the data inside the registry. If you enter or delete wrong , data or value, Windows might be unable to run after . Here we just show you how to check any unwanted program loaded into the memory when Windows start.


To change the registry data needs to run Microsoft Registry Editor - RegEdit.exe. You can click the Start Button, then select Run... item. When the Run Window will appear, then type 'RegEdit' into Open: box and click OK button.


LIKE THIS 


You might be unable to RegEdit, because the virus blocks . In this case, you need to bring up your Windows in Safe Mode to run the RegEdit. Sometimes, you need to login the Administrator account. Therefore, make sure you know your Administrator account's password when you own the new computer.

OTHERWISE  u Create a new user accound......

Microsoft System Configuration Utility MSConfig.exe keeps entries of Start-Up programs. that, System Registry has Run, RunOnce and RunOnceEx entry nodes to manage which program can run while Windows is starting.

ok do  FIRST STEP 

OPEN        HEKY_LOCAL_MACHINE.


Go down to the node in
HEKY_LOCAL_MACHINE

\SOFTWARE


\Microsoft\


Windows


\CurrentVersion


\Run


SEE LIKE THISS


Go down to the node in HEKY_CURRENT_USER\SOFTWARE\Microsoft\Windows\CurrentVersion, then look for unwanted .exe programs inside the Run, RunOnce and RunOnceEX. If you find something, then delete them.
Some virus will restore the entry later or reboot, even you delete the entry from System Registry Editor. Those virus needs special tools to kill them.

SEE THIS 


Thank you....................................................

for any conformation or doughts  cont: Jerrinjamesinfo@gmail.com
                                 or comment below

continue reading